Stack
- Server: ExpressJS (typescript)
- Client: JavaScript
- Cloud Provider: Amazon AWS
Preface
Traditionally, when uploading files in a single page app, you'd upload files directly to your backend. Now that we're all in the cloud, we store files on cheap file storage solutions like AWS S3, instead of throwing it on expensive server disks (if you dont do that yet: you should 💰)
But passing files to our backend, just so that it can send them to cloud storage isn't the most efficient. How about allowing our frontend users to directly upload to our cloud storage?
You might shout SECURITY!! right now, but there's a pattern called the "valet key pattern", that makes it not only secure but also extremely efficient.
Our example will use Amazon AWS S3's "presigned url" feature, but the other cloud providers have pretty much identical features. eg. Azure Blob Storage has "shared access signatures".
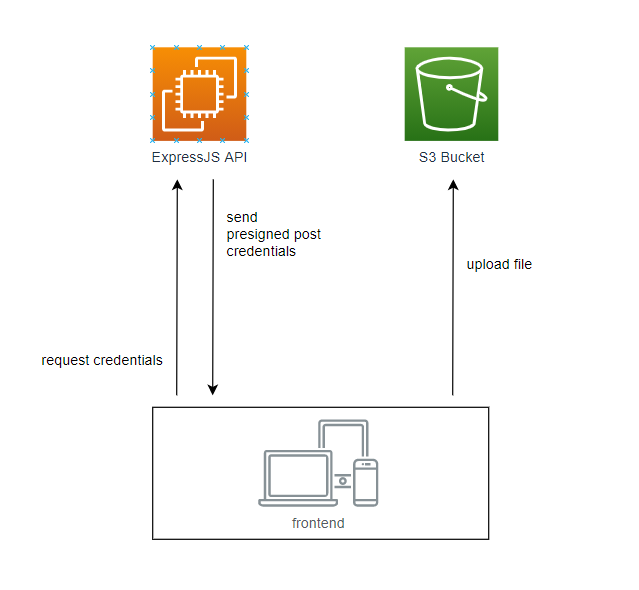
The basic concept
The tldr of this method is that our frontend sends a message to our api saying "hey i'd like to upload a file, is that okay?". Our api can then do checks for max filesize, file type, and so on. If everything is ok, it will generate some short lived credentials that act as a one-time-use token the frontend can then use to upload the file directly to the s3 bucket.
The important detail here is that in our "request credentials" request to the api, we do NOT send the full file. We only send some basic metadata like media type and size. Our api is not interested in the (heavy) file contents.
AWS S3 Setup
Bucket and API User creation
Head to AWS and create a new S3 bucket. The default settings will suffice for us, and I'll call our bucket "example-bucket".
We need a user for our backend that has programmatic access to our S3 bucket. So head to IAM (User management) and create one. I'll call mine "example-serviceprincipal", and give it the "programmatic access" type. I also create a group called "example-s3-contributor" that has the permissions "AmazonS3FullAccess".
Make sure to copy the access key ID, and secret access key! We'll need that later.
In a production setting, you'll want to limit the permissions a bit more granularly.
CORS
Back on S3 head to the Permissions tab. We need to grant access to our frontend to accesss the bucket. In the CORS section allow GET, POST and PUT requests from our frontend url.
We'll also expose two headers (make them accessible for the browser), because we'll need them later.
[
  {
    "AllowedHeaders": ["*"],
    "AllowedMethods": ["GET", "POST", "PUT"],
    "AllowedOrigins": ["http://localhost:8080"],
    "ExposeHeaders": ["Location", "ETag"]
  }
]
Bucket Policy
We'll be uploading our files to a subfolder called "public", and we want this folder to be publicly accessible by anyone. So lets add this configuration
{
"Version": "2012-10-17",
"Id": "Policy1625335161483",
"Statement": [
{
"Sid": "AllowPublicRead",
"Effect": "Allow",
"Principal": "*",
"Action": "s3:GetObject",
"Resource": "arn:aws:s3:::example-bucket/public/*"
}
]
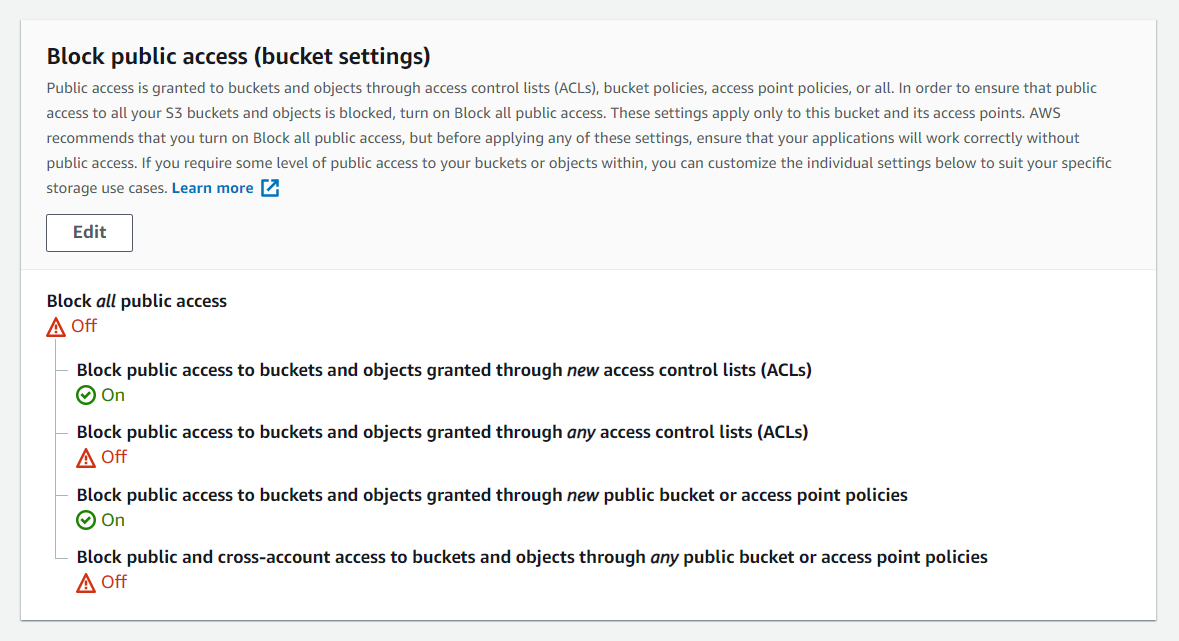
}Bucket Settings
AWS has some additional security measures to make sure stuff doesnt just go public if you mess up a configuration. For our example I've allowed public access, but blocked any accidential public access through new ACLs
Generate a presigned URL
Lets assume we have a basic express api that looks something like this
// server/src/index.ts
import express from "express";
import cors from "cors";

const app = express();
app.use(express.json());
app.use(cors());

app.listen(3000, () => {
  console.log(`The Server is running on http://localhost:${port}`);
});
AWS provides an awesome javascript sdk that allows us to interact with AWS resources.
npm install @aws-sdk/client-s3 @aws-sdk/s3-presigned-postLook up the access key id and secret we got from the user creation, and put them in our .env file.
# server/.env
AWS_ACCESS_KEY_ID=<VALUE>
AWS_SECRET_ACCESS_KEY=<VALUE>
To interact with the s3 bucket we need to create a client. Make sure you add the correct region for your bucket. Note that we dont need to add our environment variables here. The aws sdk picks those up automatically, if we name them correctly.
// server/src/index.ts
import { S3Client } from "@aws-sdk/client-s3";

const s3Client = new S3Client({ region: "eu-central-1" });
// ...
Our frontend will later send a post request to our api, to generate the presigned url. We need the client to send the type of file they want to upload. To perform some checks like limiting the maximum filesize, we could also send the size if we wanted.
// server/src/index.ts
// ...
app.post("/", async function (req, res) {
  try {
    const type = req.body.type;
    if (!type) {
      return res.status(400).json("invalid request body");
    }
    const data = await generateUploadUrl({ type });
    return res.json(data);
  } catch (e) {
    return res.status(500).json(e.message);
  }
});
To generate the signed url we have to send the createPresignedPost command to our s3 client. In our custom function, we generate a new uuid as name, to prevent conflicting filenames.
You can install this package with npm i uuid
We also make the signed post url expire after one minute. Together with the conditions, this forms a contract that limits what the user can actually upload with this generated url. If the conditions dont match, the upload will be blocked.
// server/src/index.ts
// ...
async function generateUploadUrl({ type }: { type: string }) {
  const name = uuid();
  const expiresInMinutes = 1;
  return await createPresignedPost(s3Client, {
    Bucket: "example-bucket",
    Key: `public/${name}`,
    Expires: expiresInMinutes * 60,
    Conditions: [["eq", "$Content-Type", type]],
  });
}
To try our api, I use the vscode plugin thunderclient.io
POST localhost:3000/upload
{
    "type": "image/png"
}
Success! This request now gives us a response with all the required credentials for our presigned post url 😎
{
  "url": "https://s3.eu-central-1.amazonaws.com/example-bucket",
  "fields": {
    "bucket": "example-bucket",
    "X-Amz-Algorithm": "AWS4-HMAC-SHA256",
    "X-Amz-Credential": "SOMETHINGSOMETHING/123456/eu-central-1/s3/aws4_request",
    "X-Amz-Date": "20210704T104027Z",
    "key": "public/SOME-GUID-KEY",
    "Policy": "AREALLYLONGPOLICYSTRING",
    "X-Amz-Signature": "SIGNATURESTRING"
  }
}
Upload a file using the presigned post URL in the browser
To keep it simple we'll be using vanilla javascript here, but you can apply this principle to any framework too of course.
for a quick and dirty static server I'll use
npx serve -p 8080in theclientfolder
Our form will allow the user to select a file and submit it for upload.
<!-- client/index.html -->
<form enctype="multipart/form-data" id="uploadForm">
  <label for="file">File:</label>
  <input type="file" name="file" required /> <br />
  <input type="submit" name="submit" value="Upload to Amazon S3" />
</form>

<script src="index.js"></script>
Lets make the api call from above in our browser now
// client/index.js
uploadForm.addEventListener("submit", async function (event) {
  event.preventDefault();
  const file = event.target.elements.file.files[0];
  const presignedPost = await requestPresignedPost(file);
  console.log(presignedPost);
});

async function requestPresignedPost(file) {
  const { type } = file;
  const res = await window.fetch("http://localhost:3000/upload", {
    method: "POST",
    headers: {
      "Content-Type": "application/json",
    },
    body: JSON.stringify({
      type,
    }),
  });
  return res.json();
}
To finish the fileupload, we can now use the presigned post credentials we got from this api call, and upload our file directly to our s3 bucket. We do this in one go, right after getting the presigned url.
The s3 endpoint expects a form upload, where all the credentials from the presigned post url are added as fields, additionally to the file itself.
At last, we pull the value of the Location header out of the response, to get the final url of our uploaded image. (remember that we had to make this available in our CORS config on aws)
// client/index.js
uploadForm.addEventListener("submit", async function (event) {
  // ...add the two lines below
  const uploadedFileUrl = await uploadFile(file, presignedPost);
  console.log(uploadedFileUrl);
});

async function uploadFile(file, presignedPost) {
  const formData = new FormData();
  formData.append("Content-Type", file.type);
  Object.entries(presignedPost.fields).forEach(([key, value]) => {
    formData.append(key, value);
  });
  formData.append("file", file);

  const res = await window.fetch(presignedPost.url, {
    method: "POST",
    body: formData,
  });

  const location = res.headers.get("Location");
  return decodeURIComponent(location);
}
When we now upload an image through the browser and check the console we should see the output https://s3.eu-central-1.amazonaws.com/example-bucket/public/some-guid